

The Automatons in 168澳洲幸运5开奖网:Helldivers 2 are advanced enemies of Super Earth with an ambition to destroy organic li꧙fe once and for all. While most missions that helldivers go against the bots involve destroying gunships and bot fabricators, the 🎶command bunkers pose an equal threat and must be met with might.

🐷168澳洲幸运5开奖网: Helldivers 2: Best R-3ꦉ6 Eruptor Build
Her🐎e is how to pick the perfect stratagems, sꦗecondary, and grenade for the best R-36 Eruptor build in Helldivers 2!
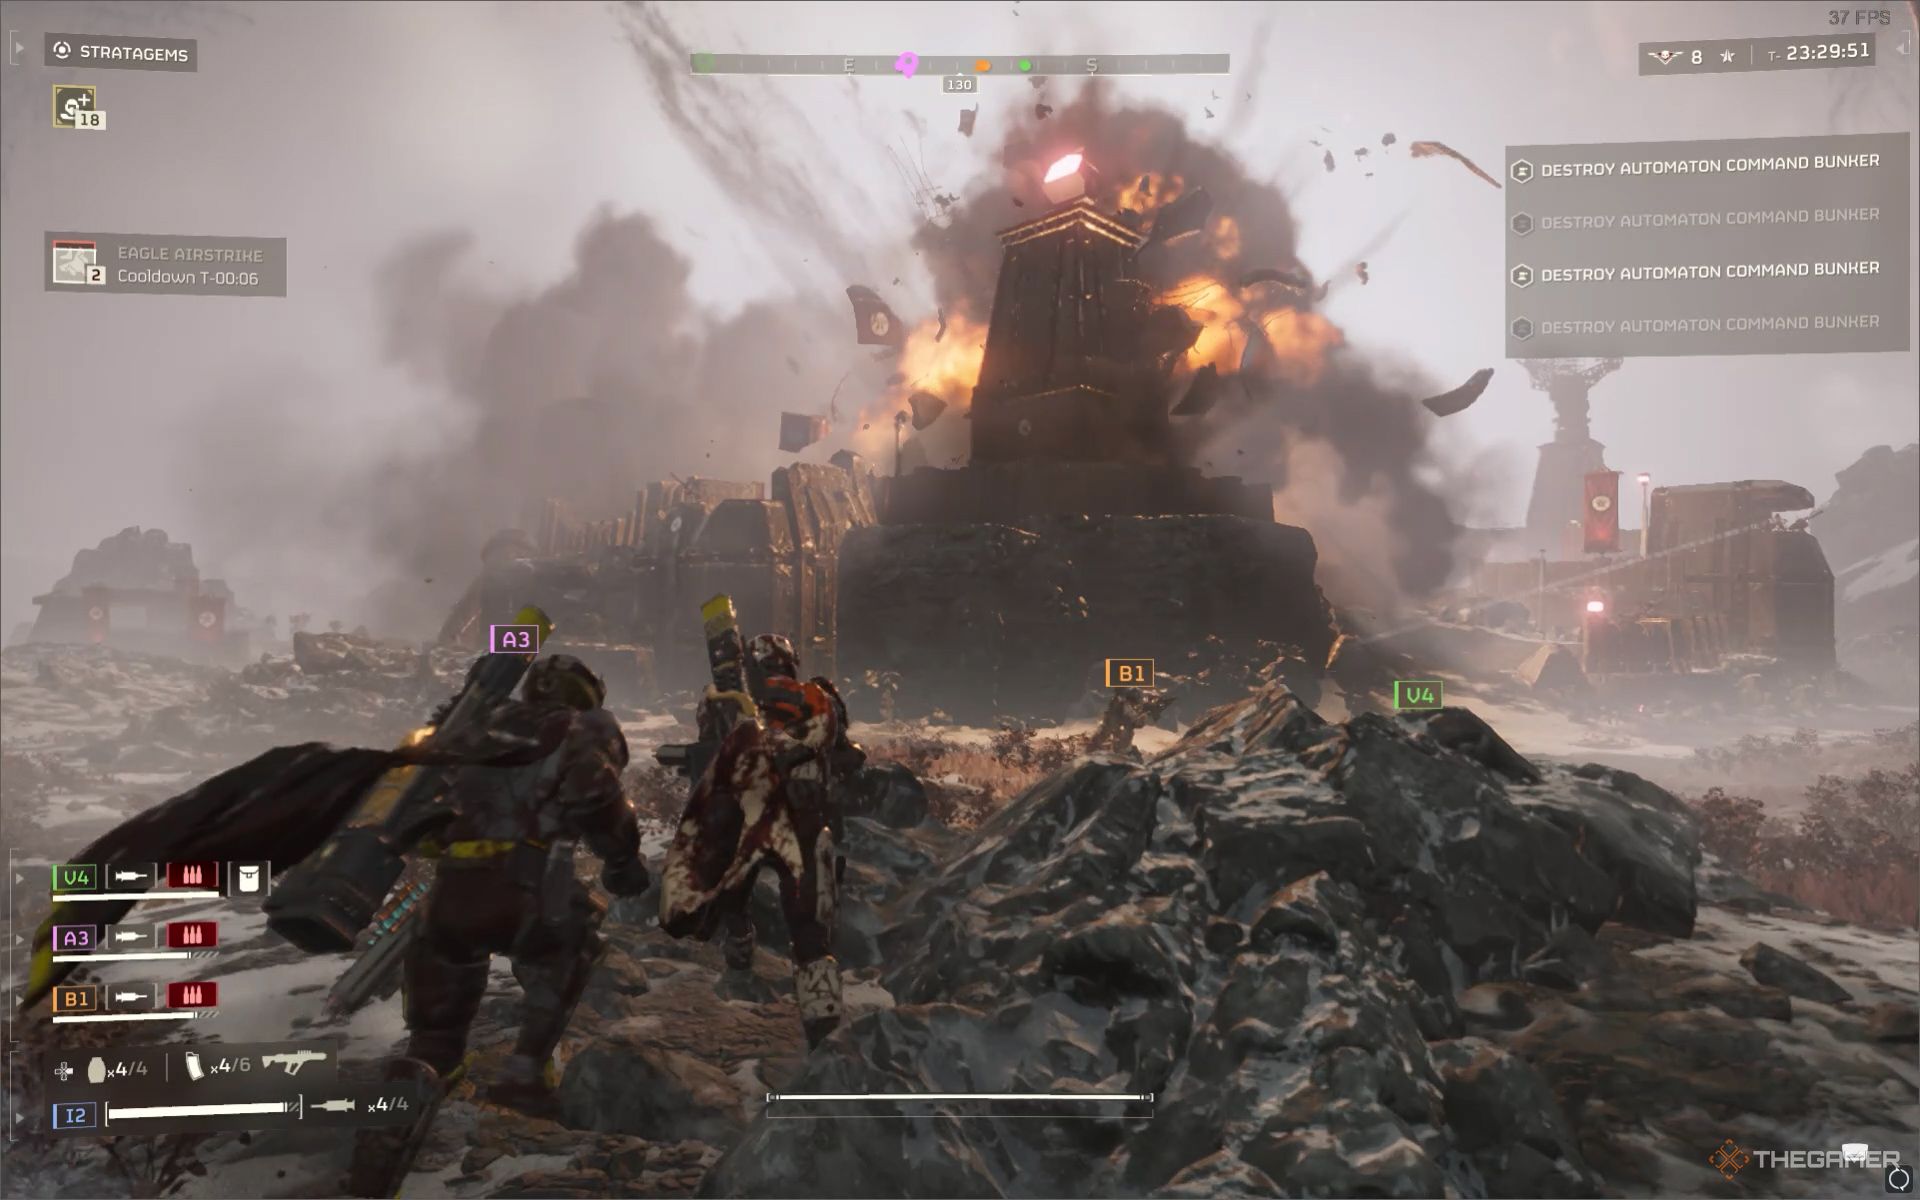
The Automaton Command Bunkers are more fortified points of interest during the longer missions. There is in𒁃creased enemy presence, which requires a proper strategy to infiltrate and destroy the bunker. This guide entails how to destroy Command Bunkers in t♈he game and damage the ranks of the bot army for good.
Understanding The Mission Design

Similar to most Automaton-occupied points of interest, such as a Stratagem Jammer or Detector Towers, the Command Bunkers are another mission objective that must be destroyed. This is a fortified base containing every possible defense the bots have laid out to ෴stop helldivers from infiltrating.
You will usually find one entrance from the front of the Command Bunkers with a few bots posted on the mounted machine guns. There will also be land mines laid out at the front to blow up helldivers on first contact.
Even if you kill bots in the Command Bunkers POI, there will be at least two Automaton Fabricators in each base to make more bots. Unless you do not destroy the fabricators, you will always find more bots to deal with,💞 and some will call reinforcements that could range from Hulks, Devastators, Rocket Devastators, Tanks, and even the AT-AT Factory Strider.

On top of all of this, the Command Bunker has four mounted plasma turrets that have the potential to one-shot you. If you get too close to the Bunker, you will find machine guns on the Bunker's walls. Other than these two weapon systems, the Command Bunker does not have other defenses to stop you from destroying ꦦit.
Best Stratagems For Command Bunkers Mission
Understanding the overall scenario regarding the Command Bunkers mission is half the picture. The other half is picking the best strategies to destroy this POI and complete the objective. The Command Bunkers are armored,꧂ and not every strategy can pe💧netrate and blow them up.
LAS-99 Quasar Cannon
The 168澳洲幸运5开奖网:LAS-99 Quasar Cannon is the perfect stratagem to pick while playing the Command Bunkers mission. The mounted turrets at the top of each Bunker can fire and kill your squad from a very long distance. You need a high firepower support weapon that can destroy it, and the is it.

Each Command Bunker has four mounted turrets, and you get nearly seven seconds cooldown on the Quasar Cannon before you can fire again. If you are on the high ground and can potentially see al꧟l the turrets of a Command Bunker, you can blow each of them all in almost 30 seconds.
This helps you and your teammates to assault the Command Bunker POI without worrying about getting one-shot by the mounted turrets.
Other than these turrets, you will need the Quasar Cannon to destroy the Hulk, Tanks, and Factory Striders that 🦄also spawn throughout the mission.
Eagle 110MM Rocket Pods
While the Quasar Cannon is more than capable of destroying heavy armored enemies such as the Hulks and Tanks during the Command Bunker mission, sometimes you need a slightly higher firepower. For this, the are best as they have the potential to one-shot heavy-armored foes instantly.

The best part of using the Eagle 110MM Rocket Pods is the reliability and faster call in time. It hardly ta🌄kes less than five seconds for the Eagle Fighter jets to drop rocket pods on a target, dealing a killing blow quickly.
While using the Eagle 110MM Rocket Pods can blow up the mounted turrets on top of the Command Bunkers, 🐽we recommend you reserve this stratagem for Hulks and Tanks only. Those pose a much greater threat if they get dropped by drop ships inside or near the Command Bunker base.
Eagle Airstrike
The is, without a doubt, one of the best aggressive stratagems to use for wiping away enemies concentrated in an area. The bombs dropped by Eagle Jets blow everything in sight, including the heavy armored foes like t🤪he Hulks, Tanks,𒈔 and Factory Striders.

However, even with all the might the Eagle Airstrike has, you cannot use it to destroy the Command Bunkers easily. One single use of this stratagem would blow up all the mounted turrets at the top of a Command Bunker but not the Bunker itself.
You will also need to throw the Eagle Airstrike stratagem onto a Command Bunker from a distance. Otherwise, this could kill y🍌ou or the entire squad if used nearby.
Equipping the will increase throw range by 30 percent, and you can throw the Eagle Airs🧸trike stratagem even while staying much further away from the Command Bunker.
Orbital Laser
While the Eagle Airstrike is excellent for crowd control, it is essentially useless against the Command Bunker. You need a higher firepower stratagem that can blow up the Command Bunker in one go, and is the perfect pick for this task.

The Orbital Laser targets foes according to the threat level. Enemies with heavy armor get targeted by this massive laser first. That is, whenever you throw the Orbital Laser stratagem near the Command Bunker, it will automatically target the Bunker and not the smaller bots near it.
However, we recommend you throw the Orbital Laser at the top of a Command Bunker or very close to it. This is because there are multiple Automaton Fabricators as well in this POI, and the Orbital Laser could target them, too, which could🐻 potentially waste the charge usaꦍge.
Do not waste your Orbital Laser other than using these on the Command Bunkers during this mission type. You only get to use the Orbital Laser three times per mission, and there are four Command Bunkers during this mission. Using it on patrols and side objectives will take away🌟 the edge of destroying the Bunkers safely from a distance.
Strategy To Complete Destroy Command Bunkers Mission On Helldive Difficulty
The go-to strategy to destroy Automaton Command Bunker is to call in the mission stratagem called Hellbomb. This will become available to you after getting close to the bunker. However, you must take down the defenses first, which stops you from reaching the Bunker itsel🍸💎f.
At the Helldive difficulty, you will be swarmed with reinforcements often as you try to infiltrate this Bunker. Tanks, Hulks, and Factory Striders will drop frequently. Going in with guns blazing is the only way to destroy the Command Bunker, and 168澳洲幸运5开奖网:the Stealth build is not an option here.
That is why you should always assault the Command Bunkers with at least three helldivers, if not all four. You need the might of all offensive stratagems and support weapons to break through enemy defenses, call in th⛎e Hellbomb, and get out before the Bunker blows and takes you with it.

Always destroy the mounted turrets first before attacking the Command Bunkers. If no enemy in the base knows of your location, which you give away when you attack the Bunker, the turrets cannot shoot you consistently. This willܫ significantly reduce the chances of you or your teammates dying frequentl𝓀y.
You must always destroy the Stratagem Jammer Towers first if they block you from using the stratagems. You 𓃲will have little to no success in destroying the Command Bunkers if your stratagems are blocked by a nearby S𒊎tratagem Jammer Tower. Make it a priority first, then approach the Bunker.

10 Tips For Using Eagle Stratagems ꦏIn Helldivers 2
Swift death from above on jet powered wings, hereও's soﷺme tips for using those Eagle Stratagems.